Although, recording foley is possible without a spotting session, it is a great help and makes recording much easier. This post will be a general overview of the goals and methods I have developed over the years to spot a film or TV series. More in-depth posts will come later on.
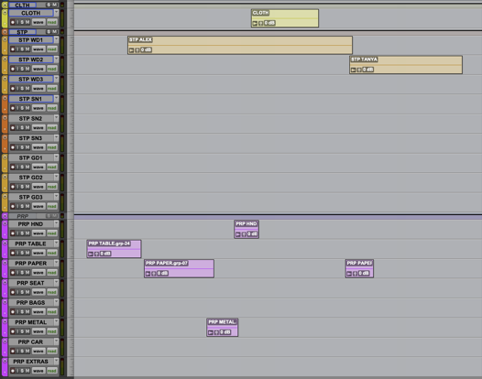
What is a spotting or cueing session? Before the digital age cues were written down on paper by hand or printed out in cue sheets. Today cues are entered into a DAW project. In Pro Tools terminology this is called a session. The spotting session is created prior to the beginning of the recording process. Its intent is to point out the exact spots when sound events happen in the timeline of a film. Here is what it looks like.

Every clip represents a sound that needs to be recorded. These clips are not audio files. They are empty clips.They are arranged in different tracks. Each type of sound is categorised in a separate track. The top yellow track is a cloth track. The orange and dirty yellow ones are the different steps tracks. The purple are the props tracks.
This forms the main three groups of sounds: cloth, steps, props. Each group has it’s own aux track which is used for routing and also provides a visual division.
The main goals of a foley spotting session are:
-Save time spent by the recordist looking through the film and searching what to record during the foley session.
-Save time spent by foley artist on preparing the props, and ground pits.
-Save time spent on mic placement, especially true when recording in a large studio
To tackle the first goal I use clip groups in Pro Tools. Besides giving you the start location of a cue, region groups also show the duration. This way you aren’t left second guessing when the cue is done. Each region is named and placed on a specific track.

As you can see, when zoomed in, many tracks are unused at this part. Why not lessen the amount of tracks? To explain this let’s talk about tackling the second and third goal of a cueing session.
Preparing props can be time consuming. For example, say you have a movie with a couple of dinner scenes scattered across the chronology. Preparing props for a dinner scene will take some time. Besides plates and cutlery you will need liquids, prop food, etc. During the recording the table will probably get messy, and you will spend time cleaning up after you are done with the scene. Obviously, its a good idea to record all the dinner scenes in one go. Of course, each might have its particularities, different glasses and food and so on, but its still rational to avoid doubling your preparation and clean up times.
When getting a new film, I will assess the repeating props and will group them into separate tracks. Taking the example of the dinner scenes, I will make a track called PRP TABLE and all my food related queues will be marked out on that track. Of course, once we start recording one track will not be enough to manage all the food and drink recordings, and we will use the neighbouring track to layer sounds. I try to keep tracks that are similar in nature close to each other. This way, after the PRP TABLE track I will sometimes make a PRP PAPER track. This track is used for table related paperwork, books, writing, but can also accommodate the food recordings. This way the recorded files sometimes slip to the neighbouring tracks, but since all the files are named, it still makes for a tidy and clear session.
Spotting in that manner, I will end up with about 8 prop tracks 6 or 7 of which will be type specific. Tracks are project dependant, but typically there will be tracks for: hands, table, chairs, beds, bags and so on. Its impossible, and unnecessary to categorise everything, so I will have a track or two that will have all the other props that don’t fall into any of the previous categories. These will often be the unusual sounds that need some extra creative attention and perhaps some new props. Off to the flee market!
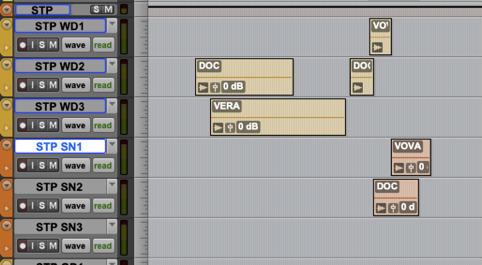
As mentioned above, the third goal is saving time spent on mic placement. When preparing tracks I think about which corner of the studio will the recording take place. A good example is step recording. Let’s say I have a film about a group of friends that live in a log cabin out in the winter woods. They will constantly change between interior wooden flooring and exterior snow. I will prepare a snow area in the ground pit, but the wood surface is in the other corner of the studio. Every displacement of the mic and the shoes will take some time, not a lot, but it sums up in the end of the project.
The productive approach would be to divide the steps into a group of tracks for wood surface steps (STP WD) and another group for the snow (STP SN). This way we can first record all the woods. Then change the mic position and record all the snow. Don’t forget to name your clips to match the character names. Always think about the editor that will work on your recordings after you.

All that is mentioned above is good and true, but perhaps a crucial point to keep in mind is this. When spotting mark out only the necessary. Always try and see the bigger picture. Will there be music or heavy sound design in this scene? Will that cue in the back ground be drowned by ambient sounds? Will this small shoe scrape help the story? If you over spot a film, you will be stressed trying to record all the irrelevant sounds that will exhaust you and eventually be muted. The worst part of that is that you will have less time to work on the important, nuanced sounds that would bring the story to life. Less is more.
In this respect spotting a movie helps me prepare for the recording mentally and physically. I can plan to sequence what to record firsthand. I know what I can do quickly and what will take time to find, invent and create. Finally, its all about keeping the fun going.


